Showing posts with label Ice Walks. Show all posts

Thursday, February 24, 2022

Frozen Waterfalls, a Cave, and A Fun Ice Hike near Kananaskis Village

Last winter my son and I headed out to find a mysterious set of waterfalls known as either Kananaskis Falls or Wasootch Falls depending on who you asked. We followed vague instructions to find the unnamed waterfall, on an unnamed creek in Kananaskis, hiking a trail that doesn't even have a sign. Heck, there isn't even a parking lot for this one!

Our adventure was filled with route finding mistakes resulting in having to retrace our steps, and a few "sketchy" moments. Add that it was -30C and we were tromping around in the woods on a new-to-us trail trying to find a frozen waterfall I could only hope was really out there somewhere!

Frozen Kananaskis Falls are easy to find - if you know where you're going!

Fortunately for you, I now know how to find the waterfall and the hike has since been added to the popular All Trails app. It's also a short hike (2 km round trip according to All Trails.) Bring your ice cleats or micro spikes for this one, and you should have no problems finding the frozen "Kananaskis Falls."

Note this hike is not suitable for young children and I recommend it for families with school aged children or teens who are confident hikers. While it's only a short hike, the trail is rough and there are many steep sections.

Frozen waterfalls and an ice cave behind

It's pretty rare when you can crawl in behind a frozen waterfall!


Where to park for the hike to Kananaskis Falls

The hike is near Kananaskis Village so head south on Highway 40 from Calgary heading for the Village. 

When you get to the turnoff for the village, you're going to turn off the highway, and then do an immediate U-turn (when it's safe,) and you're going to park on the side of the highway almost immediately after doing your U-turn. You need to be heading north to park on the side of the road beside the trailhead.

This is where the All Trails app comes in handy because it shows where the hike starts (even if you don't follow the app while hiking.) - See the trailhead here on All Trails

You'll be following the hiking trail for Wasootch Peak (different from Wasootch Ridge.)

Be a responsible hiker:

  1. Have a backup plan in place in case there are already too many cars parked on the side of the road! Because there is no parking lot, there is only room for ~ 6 vehicles to park by the trailhead. If you see that there is already a large line of cars parked on the side of the road, please consider choosing a different hike.

    So far it has not become a problem with vehicles parking on the side of the road for this hike, but if there are suddenly 50 cars parked here every Saturday, I guarantee you that it will become a problem and vehicles could start to receive tickets.

  2. Do not do a U-turn if there is a car immediately behind you turning off for Kananaskis Village!! Drive into the Ribbon Creek or the Troll Falls parking lot and safely turn around there.

  3. There are no bathrooms at the trailhead so stop at the Casino where there are bathrooms by the Tim Hortons or visit the bathrooms at one of the other nearby trailheads (Troll Falls or Ribbon Creek for example.) You could even pull into the Barrier Lake Visitor Centre. Please do not just duck behind some trees near the trailhead.

  4. This isn't an official trail but I would still recommend your dog be on leash if you choose to bring him/her. Not only is it the smart thing to do for potential wildlife encounters, but other hikers will appreciate not having a strange dog running at them on the trail.

  5. Hike out everything you take with you! Nobody is following you on the trail to clean up after you! This includes your doggie poo bags.

From the highway you'll be following a snow covered creek bed until you reach the forest trail


Hiking up the Wasootch Peak Trail to find the frozen Kananaskis Falls 

You'll be following the trail that you'd take to climb Wasootch Peak. (See it on All Trails at this link.)

You're going to start by hiking up a snowy dry creek bed until you see a trail through the trees on the left side of the creek. Follow the trail for approximately half a kilometre until you see the sign below.

You'll eventually need to drop down into the creek, but do NOT leave the forest trail until AFTER you see the sign (even if the All Trails app tells you that you are off route.) Trust me. Watch for the sign!


The forest trail climbs fairly steeply, but it's easy enough if you have microspikes or ice cleats and good winter boots.

Last year we dropped down into the creek before reaching the sign above and then had to backtrack and retrace our steps when the route through the creek became impassible. There was open water, a small frozen waterfall we'd have to climb to get above, and there were lots of logs blocking our route.

Once you've passed the sign above, look for an easy way to descend down to the creek. We didn't have too much of a problem because we had our microspikes, but I could see a bit of bum scooting being necessary without them. It is a steep descent, but you're not dropping off a cliff. Just make your way down a slope with trees as you drop into the creek.

Once you're down at creek level, it's about another half a kilometre of hiking beside the creek (which might be open in spots) until you see the waterfall (as in the photo below.)

The hiking beside the creek is a bit tricky in spots and this is NOT a hike for preschoolers or young children. Careful footing is required and it'll take you at least an hour to reach the waterfall (even if it is only a kilometre of hiking one way.)

Hiking along the creek to reach Kananaskis Falls


A beautiful waterfall and an ice cave! 


Finally, after what could feel like forever depending on whether you're breaking trail or not, you'll come to the frozen waterfall - which won't look like much at first.

This waterfall isn't much to look at from the outside. You're here for the cave behind the waterfall that will give you the feeling of being inside an ice cave.

The coolest frozen waterfall I've hiked to

Standing behind Kananaskis Falls in the coolest ice cave!

Kids will LOVE this hike to Kananaskis Falls

You're here for the opportunity to crawl behind a frozen ice curtain of blue ice, an experience that is rare to come by.

Hopefully you'll get some time at the waterfall be yourself, but if there are other groups at the falls expect to wait for your turn to get close to the ice.

And please be respectful of other groups waiting their turn to go behind the waterfall. This isn't the place to have your lunch while others wait or to set up a fancy elaborate Instagram shoot when there's a queue forming behind you.  

Blue ice behind Kananaskis Falls

When we did this hike last winter, nobody knew about it, and it was easy to get the cave all to ourselves. This hike is becoming popular though so I recommend going mid-week if you want a quiet experience, or starting early to avoid the crowds.

Kananaskis Falls is a great half-day adventure!

Other activities to do in the area


Since this is a half-day hike, you'll want a few suggestions for other activities to do in the area unless you're only wanting a short outing.

You'll also want some backup plans in case there are already a dozen ore more cars parked along the highway beside the trailhead.

  • Hike Troll Falls and Visit the Upper Falls (where there's another waterfall you can go behind.)

  • Visit Kananaskis Village where there's a sledding hill and skating pond

  • Spend the morning skiing at Nakiska and then hike to Kananaskis Falls in the afternoon

  • Hike the Ribbon Creek Trail (where there are several fun bridges.)


Friday, October 18, 2019

The Best Ice Hikes in Kananaskis and Banff

Hike through a canyon on a solid ice creek bed to view large towering frozen waterfalls. Crawl behind curtains of ice, climb around on the ice, or even bring your skates when conditions are right. These are the top four ice walks near Calgary and they are all family-friendly.

Discover magical Troll Falls this winter in Kananaskis 


Jura Creek, Kananaskis


While there are other good hikes in Kananaskis that can be done in winter, Jura Creek is something special because it's a hike that can not really be done in summer.  The canyon through Jura Creek can only be tackled in winter when the water is well frozen under a layer of ice and snow.

The Jura Creek Canyon is also one of the tightest canyons in the area. There are sections where you can place one hand on each side of the canyon wall as you walk.  It's absolutely awesome and perfect for kids chasing each other around the tight twists and turns.

Magical ice walk through the Jura Creek Canyon 

Add ice slides and a frozen creek bed if the ground isn't covered with snow, and you have a magical adventure for kids. Best of all, this is a short half-day outing and less than an hour away from the west side of Calgary.

And NOTE - there is now an official parking lot for Jura Creek with an outhouse.

Hiking through the narrow Jura Creek canyon in Kananaskis


Read: Jura Creek - The Best Winter Hike in Kananaskis

Read: Ice, Ice, Baby - Winter Canyon Hiking 

Read: The Wildest Winter Family Hike in Kananaskis 

Family-friendly hiking in the Jura Creek canyon 

Troll Falls and beyond to the Upper Falls, Kananaskis


Troll Falls at Kananaskis Village just might be the best winter hike near Calgary for families. It's one of the easiest winter hiking options for our area, and is a guaranteed crowd pleaser for all ages. We've done this outing dozens of times, and have never had a bad day.

Troll Falls, Kananaskis 


Troll Falls is blessedly short with less than a 4 km round trip distance if you start from the Stoney Trailhead near Kananaskis Village.

Read: Five Reasons Families LOVE Visiting Troll Falls in the Winter 


Playing behind curtains of ice at Troll Falls


Want to go further with older kids and have a solid spirit of adventure? Try going beyond Troll Falls to the Upper Falls. Along the way you'll pass several different ice falls and you can even walk behind frozen Marmot Falls.

Marmot Falls above Troll Falls en route to the Upper Falls 

Disclaimer: As of 2021 there is now a barricade in front of Troll Falls and you can no longer approach the falls as seen in photos here. To get up close to frozen falls continue up to Marmot Falls which you can still walk behind.


The Upper Falls above Troll Falls 


Grotto Canyon, Kananaskis 


Families will love hiking on the solid ice creek bed here with ice slides everywhere and a natural skating rink if you time your visit right.

It's approximately a 2 km hike to reach the set of twin waterfalls at the end of the "fun part" of the Grotto Canyon hike. After this point, the canyon opens up and it's more just flat walking up a creek bed.

One of the frozen waterfalls on the Grotto Canyon hike

At the waterfalls you can watch ice climbers putting on a show and kids will have fun on the giant ice slide. Note that if you hike up the ice slide (with spikes,) you'll find a third hidden waterfall (usually with more climbers on it.)

Playing on natural ice slides in Grotto Creek


Read: Grotto Canyon Ice Walk - 5 Reasons We LOVE this Hike

I timed my visit perfectly once to skate a part of the canyon

Kananaskis Falls, Kananaskis Village


When people think of frozen waterfalls near Kananaskis Village they always think of Troll Falls, but there's a new kid on the block and it's locally known as "Kananaskis Falls."

The coolest thing about this hike is that you get to crawl behind a frozen waterfall into an "ice cave" hiding behind the large curtain of ice.

Hiding in the cave behind Kananaskis Falls

The waterfall is located off the trail to Wasootch Peak, an unofficial trail located very close to the turnoff for Kananaskis Village off Highway 40. Note it is not the same trail as Wasootch Ridge further down the road.

The hike is only 2-3 km round trip so it's a great half day adventure with school aged kids or older youth. It is not suitable for young children or toddlers.


Kananaskis Falls and the cave behind the ice curtain

Johnston Canyon, Banff National Park 


There must be photos of Banff's Johnston Canyon hiking trail on billboards across the world advertising the Canadian Rockies.  Come summer, you'd be hard pressed to get a photo on this popular trail without at least two dozen tourists in the shot, and you could be parking a mile down  the road in order to get near the place.

Hike Johnston Canyon in winter though and you'll find solitude in abundance, you'll get your quiet moments on the trail, and you might even have the whole place to yourself if you visit on a cold day.

Christmas hiking at Johnston Canyon in Banff

The highlight of this hike is the Lower and the Upper Falls which can both be reached in a return hike of 5.4 km. In the past we've also enjoyed descending down into the canyon near the upper falls where there's a fun cave and a beautiful frozen waterfall (shown in the photo above)

There is a restriction against leaving the official trail to drop down into the canyon in the summer but it is lifted for the winter. Check for important closures and restrictions here before you visit. 

Frozen waterfall from inside the cave off the official trail


Read: The Most Popular Hike in Banff without the Crowds 

Read: Ice Caves and Frozen Waterfalls in Banff National Park 

Upper Falls at Johnston Canyon 

Recommended Gear and Safety Tips for Ice Hiking 


Please know that hiking in icy canyons can be very dangerous and you'll want to be sufficiently prepared should you decide to take your family on an ice hike.

Recommendations:

Troll Falls, Kananaskis 

  • You'll want a good pair of ice cleats or micro spikes for each member of your family. We use Kahtoola Microspikes which can be purchased at most outdoor stores. 

  • Spikes work much better than snowshoes, but in a pinch, you could use snowshoes if hiking trails like Jura Creek.

  • We've often used helmets for the children when hiking on ice. We compare it to ice skating and like to be extra cautious.

  • Exercise caution when hiking underneath ice, inside ice caves, or when  trying to climb on ice. Ice breaks and you don't want to be on or underneath a waterfall if a big chunk falls off.

  • Be very careful with children who like "sliding" on ice. I've seen kids try to slide down frozen waterfalls, only to pick up speed and end up nearly landing on their heads. 


Monday, August 12, 2019

Bow Hut Family Alpine Adventure, Banff National Park

The Alpine Club of Canada has an amazing network of backcountry huts and cabins, and we try to hike in to one new hut each summer as a family. We enjoy the remote locations for each hut, the amazing scenery that we get to explore hiking to our destination, and the comfort that comes with sleeping in a warm dry cabin.

The Alpine Club of Canada's Bow Hut, Banff National Park 


Searching for a New Backcountry Hut to Visit this Summer 


It's getting increasingly challenging to find new destinations close to Calgary that that don't require a multi-day road trip just to reach the trailhead. Many of the huts also require glacier travel or significant mountaineering experience, which eliminates them for the time being with a 10 year old.

 - To see a full list of the other huts we've already visited (with links to the stories I've written) scroll to the bottom of this guide.

One new hut that was well within our abilities with a ten year old child was the Bow Hut perched on the edge of the Wapta Icefield along the Icefields Parkway between Lake Louise and Jasper. And, we've actually attempted to reach this hut several times, but have always been rained out and ended up canceling. - which actually wasn't much different this time except that we gambled on a bad weather forecast, committed to the trip, and won with much better conditions than expected.

It was a soggy hike in, but we reached the hut in time for the sun to come out


Information and Stats for Visiting the Bow Hut


General Location: On the east side of the Wapta Icefield, above Bow Lake in Banff National Park

Trailhead: Bow Lake on the Icefields Parkway

Hiking Distance from Bow Lake to the Hut: 8 kilometres one way with 400 metres height gain

Time it took us to reach the hut: It took us 4 hours to reach the hut on the way in (3 hours on the way out)

Hiking in on the Bow Lake Trail


Difficulty of the hiking trail: The approach is not a hard one, but you do have to cross a giant chockstone (the crux of the trail because a fall would be fatal) which you'll see a photo of below. The trail is also a mountaineering access route (the hut was built to allow climbers to reach the glacier and peaks above) so expect some route finding once you leave the official hiking trail for Bow Glacier Falls.

For a complete route description follow this link to the ACC website.

Crossing the giant chockstone en route to the Bow Hut

Cost to spend the night: $30 per night for Alpine Club of Canada members, $40 for non-members. Children are half price. A wilderness pass is also required for each adult at a rate of $9.75 per night.

Booking spaces: Follow this link to make a reservation. A booking can be made up to a year in advance if you are a member. (30 days for non-members)

Sleeping Capacity of the hut: 30 people in a shared sleeping room (the room is divided into upper and lower sleeping platforms - like large bunk beds)

Hiking up the rough trail above the Bow Glacier Falls turnoff 

Layout of this hut:

This is one of the BEST ACC HUTS for layout!! There are two separate rooms (one for sleeping, and one for eating/cooking/socializing) and they are separated by a long hallway to keep the bedroom nice and quiet.

Both rooms are on the same level so you don't have the issue of hot air rising and people suffocating in the loft while others are freezing on the main level huddled around the fireplace.

The outhouse is also reached from the inside just off the hallway so you don't have to go outside in the middle of the night.

The hut has two separate rooms for sleeping and eating with a hallway connecting them


What to bring with you: 

Guests at an ACC hut have to bring their own sleeping bags, food, basic overnight gear, headlamps, and slippers or inside shoes. Other than that, the hut comes equipped with sleeping mattresses, propane stove tops (with a full size propane oven) and lanterns, cooking supplies and all dishes, and the bathrooms were stocked with toilet paper. There is also a wood fireplace which helps to dry wet clothes.

Other than that, consider this a backpacking trip and plan your food accordingly. (There is no fridge at the hut.) You'll also have to boil water to drink or bring a water filter for the creek.

There were lots of creek crossings on the way in! 

Hiking in to the Bow Hut 


Our hike in took about 4 hours and was pretty soggy towards the end (we arrived at the hut soaking wet.) Honestly though, it could have been worse and it only really started raining in our last half hour.

Climbing the stairs up towards the Bow Glacier Falls turnoff from the lake 

My husband and I knew the route well so there were no challenges with directions, but we knew it would be a little scary getting our son across the giant chockstone, so we'd brought a short length of rope and his harness for this section. My husband belayed him across to ensure complete safety (you only get one shot at raising your kids and bringing them to adulthood in one piece.)

And while the chockstone may not look that "bad" from the photos, it's super hard to get up onto it from the approach side (as you can see the big climb up in the photo below) and a fall off the top would be fatal.

A photo of the chockstone crossing from our hike out 

Other than that, the only other challenge came with the frequent creek crossings but we were pros at this by the end. (I recommend good waterproof footwear and hiking poles!)

One of the creek crossings on our hike out 

Day Trip Plans from the Hut 


We were originally planning to spend two nights at the hut until the weather forecast convinced us to just do a shorter one-night trip. In hindsight, the weather ended up being better than expected once we reached the hut and we could have spent the full two nights.

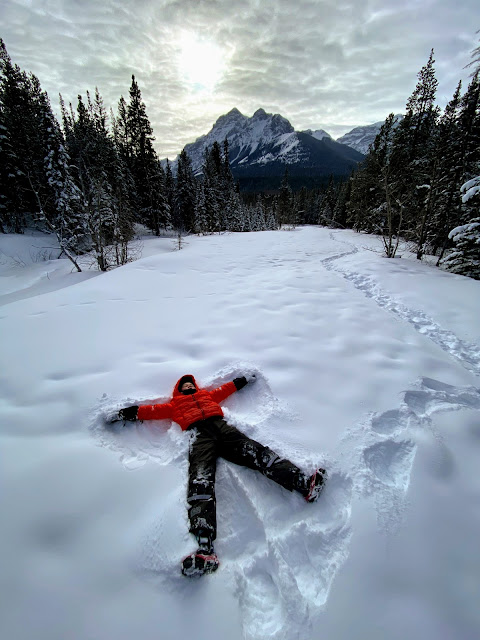
In a full day from the hut, there are many options for exploring. We had been hoping to do an easy glacier traverse to summit Mt. Thompson (an easy walk up mountaineering objective) with another family. The other family pulled out of from the trip though after seeing the weather forecast, and so we chose to do something easier.

For families wanting to explore around the hut (without getting on the glacier) there are a couple of fun options which include visiting an ice cave and hiking to the top of a nearby family-friendly summit called the Onion.

There are several fun options for families wanting to explore around the hut without getting on the glacier 


Climbing the "Onion" from Bow Hut 


This is the most popular objective for most hikers looking for a non-technical summit to reach from the hut. Pretty much the entire group staying at the hut with us had made it up to the top at some point during their visit.

We arrived at the hut in the rain, but within an hour, the skies had cleared, we were dried off, and we'd had our first dinner. We decided to head out to hike up to the summit of the Onion before having a late second dinner. 

The sun came out and we climbed up above the hut to begin hiking towards the Onion

The Onion is located roughly 300 metres above the hut (making for a height gain of 700 metres from the highway.) 

It took us approximately 2 hours round trip to reach the summit, to stop at the ice cave on descent, and to make it back to the hut.

For us, this meant that we did a total of 6 hours of hiking on our first day and had completed the full 700 metres of height gain. For a more relaxing day I recommend spending a second night at the hut and hiking up to the Onion on your rest day.

Fun hiking on rock ribs towards the Onion 

The hike up the Onion is a "route" and there is no official trail. For that reason I suggest you talk with other visitors at the hut before heading out. Anybody at the hut will be able to point you in the correct direction to reach the Onion. 

Tarn, Bow Glacier, and Mt. St. Nicholas en route to the Onion 

Step one for reaching the Onion was to hike up above the hut, heading towards a small glacier tarn, and then making our way up lots of fun scrambly rock ribs on the lower slopes of the Onion past some waterfalls.

The rock was so much fun to scramble and we found these cool pools of water 
Lots of fun scrambling on rock up the Onion
This was some of the most fun scrambling I've done in a long time!
We were always rewarded with views of the Bow Glacier and St. Nicholas in the background (a peak I'm rather partial to after climbing it years ago.) 

And if you pay attention to the Bow Glacier in the photo below, that was our descent route off the Onion rather than scrambling back down the rock. 

Climbing above the Bow Glacier with St. Nicholas in the background 

I don't recommend following our descent option though unless you have significant experience on glaciers, and can determine if this section of the glacier is safe at the time of your visit (when we were there, there was significant snow coverage on the glacier, and it had been well traveled. We were very secure that we wouldn't be falling into any crevasses.) 

Also know that if you are going to descend the glacier, there is an ice cave at the bottom of it. You don't want to fall into the cave (which is full of water.) Make sure you know exactly where the cave is when choosing your descent line.

The views were incredible the higher we got! 

We continued climbing higher until we had the option to get on a snow field below the summit. When faced with snow Vs. rock, we always choose snow as long as it's safe to do so - and this snow was totally safe to be climbing. We were just on snow-covered rock here (not glacier.)

Climbing up the snow field below the summit of the Onion 

It was easy walking up the snow (and we had good boots that kept our feet relatively dry.) Plus, look how incredibly gorgeous this was!! I felt like we were on a mountaineering expedition just hiking up this snow - and now I totally want to go back next summer.

Climbing up a snow field above the Bow Glacier 

Once we reached the edge of the snow field, it was just a plod up rock to the summit where we found a large cairn overlooking Bow Lake.

Ready to start the final climb up rock to the summit 

The Summit of the Onion 


The summit was gorgeous looking down on Bow Lake. We didn't have a lot of time at the top though since we got such a late start, so I definitely want to return next summer. 

Looking down on Bow Lake from the summit of the Onion 
Onion Summit with my boys looking back on the Wapta Icefield 
Summit of the Onion 

Descending the Bow Glacier to the Ice Cave 


We wanted to go visit the ice cave on our way back to the hut, and since it was at the base of the glacier, there was no faster way to reach it than by running straight down the glacier. 

Hiking down the Bow Glacier back to the Bow Hut

We really did run down the glacier! It was so much fun!! 

The glacier was in great shape when we were there for a quick run down and the snow was nice and deep to cover anything up. - and running down this glacier was so much fun!! It was a highlight of our entire summer so far.

My husband loved leading us down the glacier
Approaching the tarns again and the ice cave at the bottom of the glacier

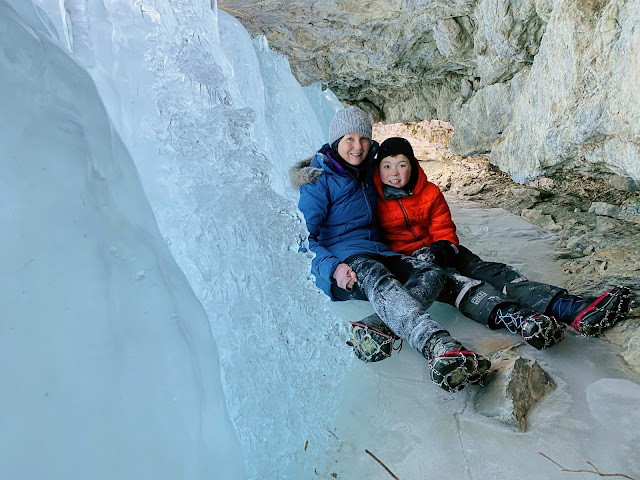
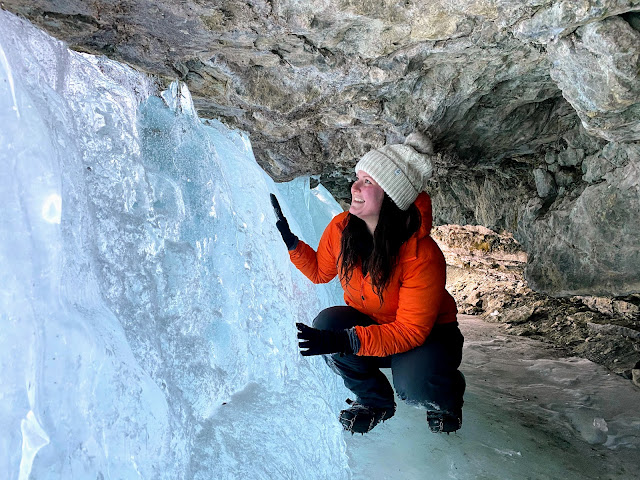
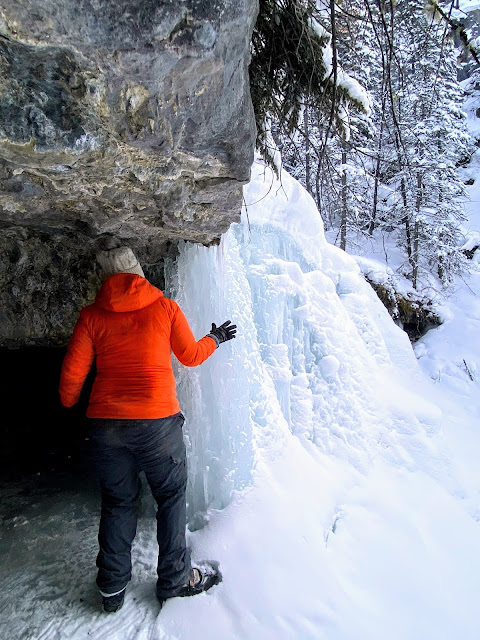
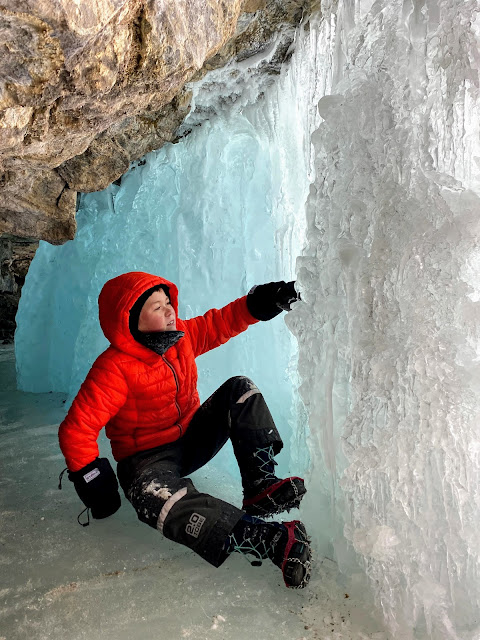
 The Ice Cave at the bottom of the Bow Glacier 


This is a short outing from the hut even if you don't want to go climb the Onion. You don't have to get on the glacier and it's a very short walk above the hut.

And no, you can not explore inside the cave. It's filled with very cold deep water.

We found the ice cave below the Bow Glacier
You don't want to be running down the glacier and suddenly end up falling through into the cave!

Back at the Hut and Hiking out the Next Day 


We got back to the hut, finally had an official dinner, and watched as it continued to "not" rain - the weather forecast totally changed once we arrived at the hut!

It was overcast but dry the whole night at the hut

The next morning it was still sunny and we had a gorgeous hike out! We definitely should have stayed for two nights!

It was a gorgeous morning for our hike out
Hiking down the steep trail from the hut 
Back to the creek crossings 
In this photo you can see the Bow Hut to the left and the rounded summit of the  Onion to the far right 

You can see the rounded summit of the Onion in the photos above and below.

Hiking down below the rounded summit of the Onion 
There is a lot of rock traversing on this hike (wear good hiking boots!)


The creek with the chockstone crossing 

 It only took us 3 hours to hike out and we headed straight to Lake Louise for lunch.

Hiking down the staircase below the junction with the Bow Glacier Falls Trail

Back at Bow Lake 

For more information on this hike or to make a booking for next summer, please visit the Alpine Club of Canada's website. 


Resources and Recommended Reading (other huts we've stayed at)


Family Backcountry Cabin Camping in the Canadian Rockies


 Backcountry Cabin Camping with Kids - Elk Lakes Cabin, BC  


Summer Backpacking Trip to the Asulkan Cabin, Rogers Pass  


Backpacking in the Bugaboos (and our first family glacier traverse) - Conrad Kain Hut 


Backcountry Cabin Camping  with Kids - Stanley Mitchell Hut, BC


Easter at the Wheeler Hut, Rogers Pass


The Easiest Family Winter Backcountry Trip (Wheeler Hut, Rogers Pass)


Winter at the Cameron Lake Cabin, Waterton Lakes National Park 


Easter at the Elizabeth Parker Hut, Lake O'Hara   


Winter Camping with Kids ( No Tent!!) 


Snowy Adventures in Elk Lakes Provincial Park


Raising Tough Kids - Our Annual Winter Backpacking Trip